第61章:Command ②:標準(ICommand)で体験(WPFのミニ)🖱️✨
ねらい 🎯
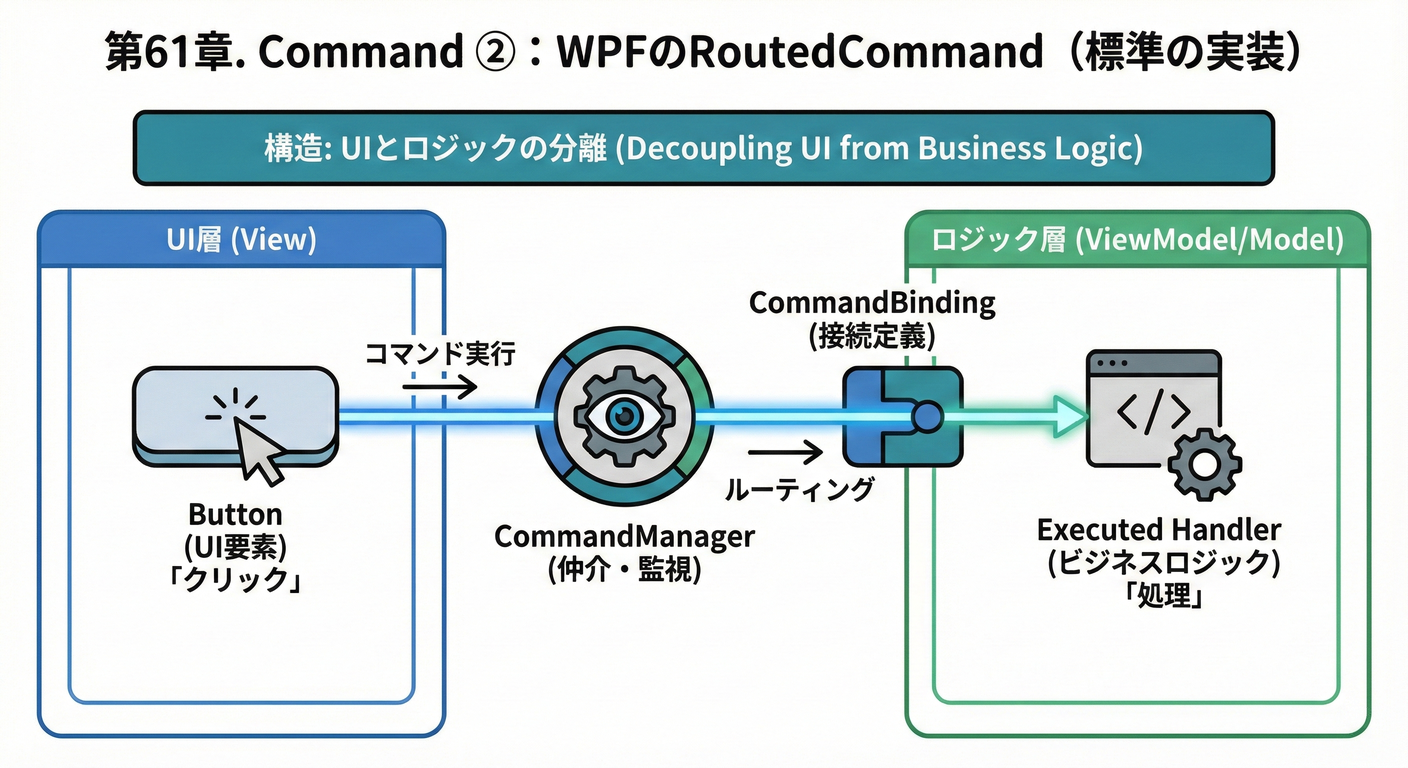
WPFの「コマンド」って、ボタンのクリック処理を“その場で書く”のとは発想がちょっと違います🙂 「やりたい操作」を ICommand(命令)として別物にして、ボタン・メニュー・ショートカットキーから同じ操作を呼べるようにします✨
さらに、CanExecute が false だと ボタンが自動で無効化されるのが強い…!🧁
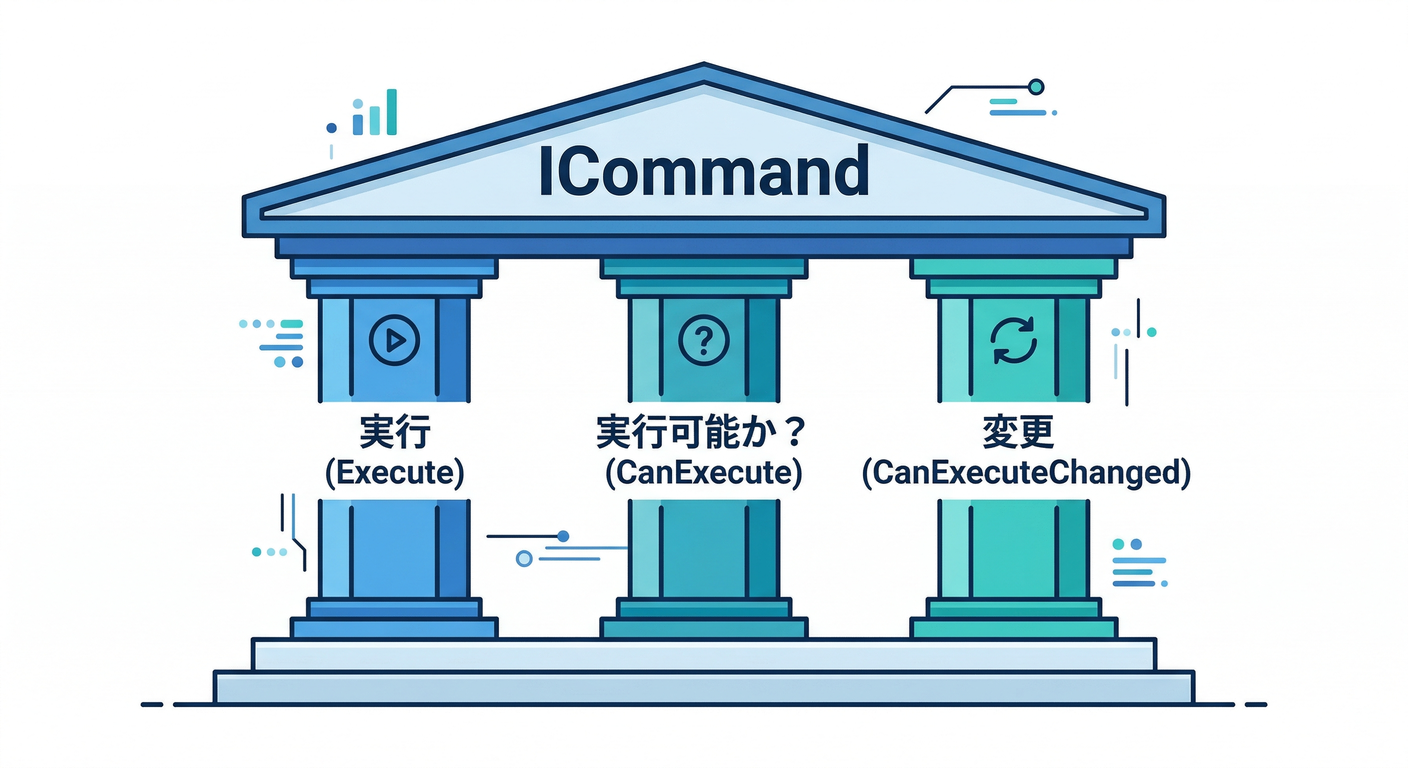
ICommandは CanExecute / Execute / CanExecuteChanged という形で定義されています。(Microsoft Learn)
到達目標 🧠✨
ICommandの **3点セット(CanExecute / Execute / CanExecuteChanged)**を説明できる🙂(Microsoft Learn)- WPFで Button / MenuItem / Ctrl+Enter を全部同じ操作につなげられる⌨️✨
CanExecuteで 押せる/押せないを作って、UIが自然に連動するのを体験できる🌸CommandManagerとCommandBinding / InputBindingの役割をざっくり言える🧩(Microsoft Learn)
手順 🛠️✨
1) まず「Commandの気持ち」を掴む 🧃
-
Clickイベント:ボタンに「その場で処理」を書きがち
-
Command:
- 「操作(命令)」を ICommand として分離する
- ボタン・メニュー・キー入力は “呼び出し役”
- 実際に何をするかは “実行役”
- 押せるかどうかは
CanExecuteで決める
WPFのコマンド機構は CommandManager が関わっていて、CanExecute 再評価の仕組み(RequerySuggested など)も説明されています。(Microsoft Learn)
2) ミニ題材:注文確定(PlaceOrder)を「コマンド」にする🛒✨
画面にこれだけ置きます🙂
- 金額入力(TextBox)
- 「注文確定」ボタン(Button)
- メニューの「注文確定」(MenuItem)
- Ctrl+Enter でも同じ操作(KeyBinding)
3) XAMLを書く(ボタン/メニュー/キーを同じCommandへ)🧷✨
MainWindow.xaml をこんな感じにします👇
<Window x:Class="WpfCommandMini.MainWindow"
        xmlns="http://schemas.microsoft.com/winfx/2006/xaml/presentation"
        xmlns:x="http://schemas.microsoft.com/winfx/2006/xaml"
        Title="Commandミニ" Height="220" Width="420">

    <!-- Window全体に「このコマンドはこう処理する」を登録 -->
    <Window.CommandBindings>
        <CommandBinding Command="{x:Static local:MainWindow.PlaceOrderCommand}"
                        CanExecute="PlaceOrder_CanExecute"
                        Executed="PlaceOrder_Executed"/>
    </Window.CommandBindings>

    <!-- ショートカットキーで同じCommandを呼ぶ -->
    <Window.InputBindings>
        <KeyBinding Key="Enter" Modifiers="Control"
                    Command="{x:Static local:MainWindow.PlaceOrderCommand}"/>
    </Window.InputBindings>

    <DockPanel>
        <Menu DockPanel.Dock="Top">
            <MenuItem Header="_Order">
                <MenuItem Header="注文確定(_P)"
                          Command="{x:Static local:MainWindow.PlaceOrderCommand}"/>
            </MenuItem>
        </Menu>

        <StackPanel Margin="16" VerticalAlignment="Center">
            <TextBlock Text="金額(円)" Margin="0,0,0,6"/>
            <TextBox Name="AmountTextBox" Height="28" Margin="0,0,0,12"
                     TextChanged="AmountTextBox_TextChanged"/>

            <Button Content="注文確定"
                    Height="32"
                    Command="{x:Static local:MainWindow.PlaceOrderCommand}"/>

            <TextBlock Margin="0,10,0,0" Foreground="Gray"
                       Text="ヒント:Ctrl + Enter でも注文確定できるよ🙂✨"/>
        </StackPanel>
    </DockPanel>
</Window>
ポイント💡
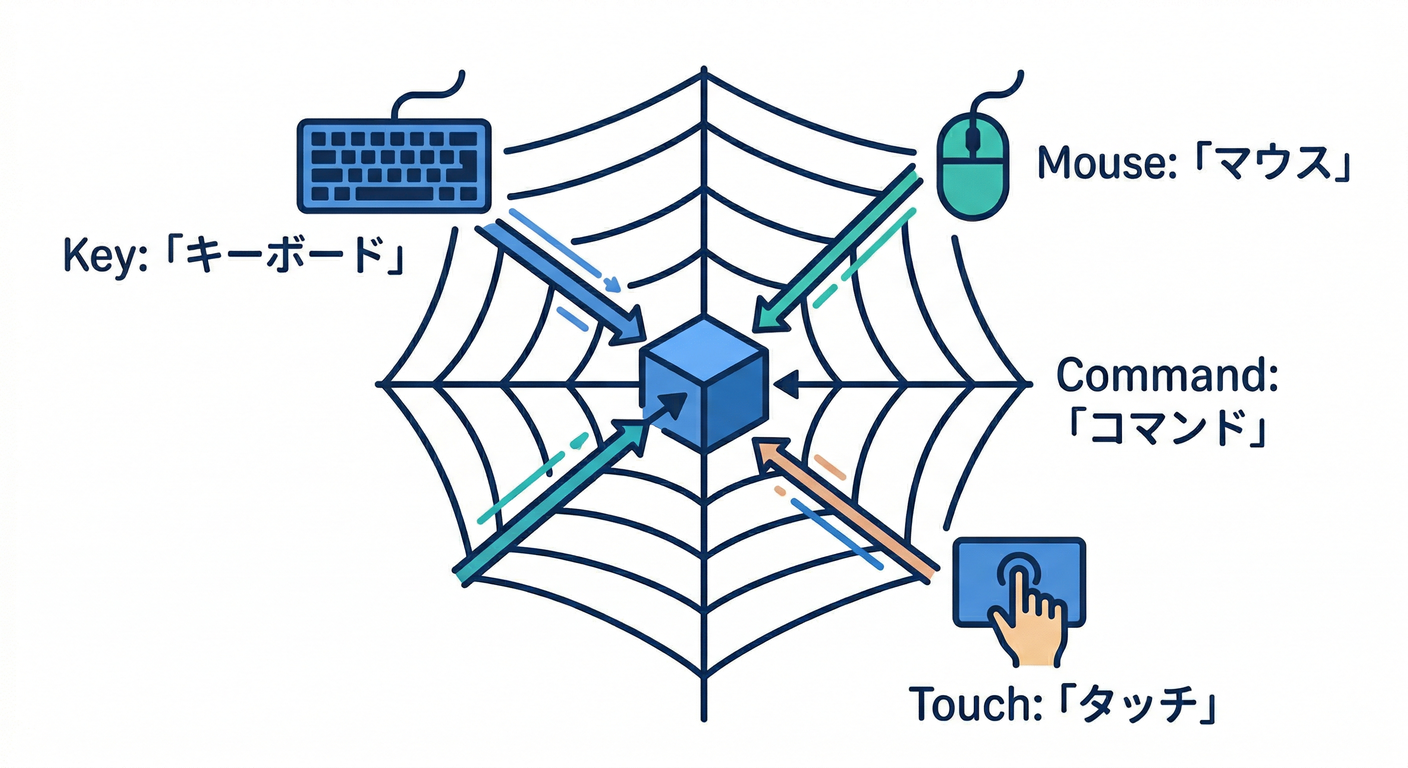
- ButtonもMenuItemもKeyBindingも 同じCommand を指してる😍
- どこから呼んでも、実行ロジックは1か所に集まる✨
4) コマンド本体(RoutedCommand)と CanExecute/Executed を書く 🧩✨
MainWindow.xaml.cs に追記します👇
(WPF標準のルーティングコマンドを使って、“WPFのCommandらしさ”を体験します🙂)
using System.Globalization;
using System.Windows;
using System.Windows.Input;

namespace WpfCommandMini;

public partial class MainWindow : Window
{
    // WPFの「ルーティングコマンド」:CommandBindingで処理を結びつける
    public static readonly RoutedUICommand PlaceOrderCommand =
        new RoutedUICommand("注文確定", "PlaceOrder", typeof(MainWindow),
            new InputGestureCollection { new KeyGesture(Key.Enter, ModifierKeys.Control) });

    public MainWindow()
    {
        InitializeComponent();
    }

    private void PlaceOrder_CanExecute(object sender, CanExecuteRoutedEventArgs e)
    {
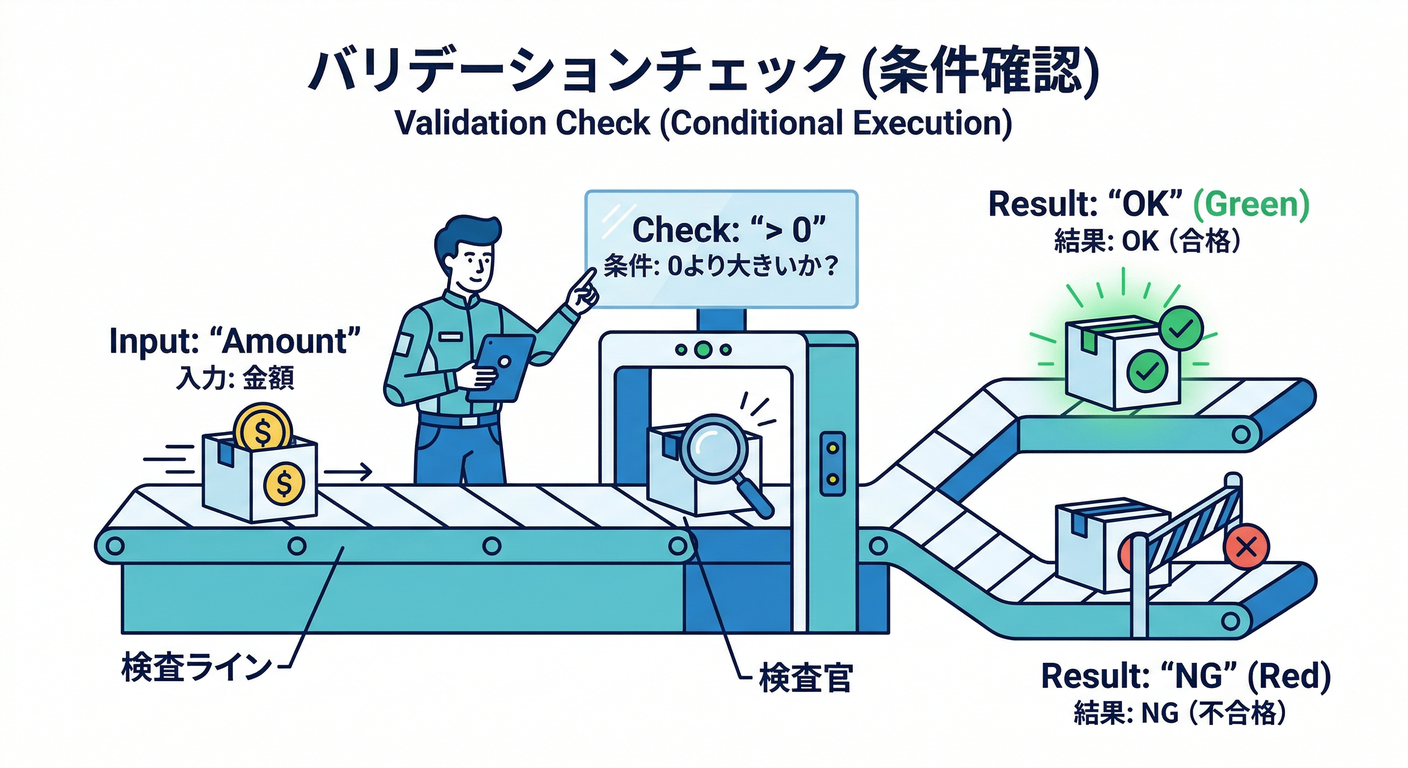
        // 金額が「正しく数値として読み取れて」「0より大きい」なら押せる
        e.CanExecute = TryReadAmount(out var amount) && amount > 0;
        e.Handled = true;
    }

    private void PlaceOrder_Executed(object sender, ExecutedRoutedEventArgs e)
    {
        if (!TryReadAmount(out var amount))
        {
            MessageBox.Show("金額が読み取れないよ〜🥺", "エラー", MessageBoxButton.OK, MessageBoxImage.Warning);
            return;
        }

        MessageBox.Show($"注文確定!🎉  金額:{amount:N0} 円", "OK", MessageBoxButton.OK, MessageBoxImage.Information);
        AmountTextBox.SelectAll();
        AmountTextBox.Focus();
    }

    private void AmountTextBox_TextChanged(object sender, System.Windows.Controls.TextChangedEventArgs e)
    {
        // TextBox変更のたびに「押せる?押せない?」を再評価してほしい
        // CommandManager が RequerySuggested を発火させる仕組みを持ってるので、
        // ここでは明示的に再評価を促す🙂
        CommandManager.InvalidateRequerySuggested();
    }
    private bool TryReadAmount(out decimal amount)
    {
        // ちょい優しめ:空白許可、カンマも許可
        var text = AmountTextBox.Text?.Trim() ?? "";
        return decimal.TryParse(text, NumberStyles.Number, CultureInfo.CurrentCulture, out amount);
    }
}
ここで使ってる CommandManager.InvalidateRequerySuggested() は、コマンドの再評価(RequerySuggested)を促す代表的な方法として説明されています。(Microsoft Learn)
(ICommand 自体の定義もここがベースです🙂)(Microsoft Learn)
5) 動かして観察する 👀✨
- 金額が空、または 0、または文字 → ボタンが 押せない(無効)😴
- 金額が 1000 とか → ボタンが 押せる(有効)💪
- ボタンでも、メニューでも、Ctrl+Enterでも → 同じ処理が走る🎮✨
この「呼び出し元が増えても、実行の中身は1か所」の体験が、Commandのめちゃ旨ポイントです🍰
6) AIに手伝ってもらうコツ 🤖📝
雛形生成は便利だけど、コマンド周りは “盛りがち” なので注意⚠️😵 おすすめの投げ方はこんな感じ👇
- 「WPF RoutedCommand と CommandBinding の最小例。TextBoxの内容で CanExecute を切り替えたい」
- 「CommandManager.InvalidateRequerySuggested を使う理由を短く説明して」
そして レビュー観点 はこれ💡
CanExecuteが 速い(重い処理してない)🕊️Executedが UI操作と業務処理をごちゃ混ぜにしてない(今回はミニだからOKだけど、肥大化の芽は早めに摘む)🌱- ショートカット・メニュー・ボタンが 同じCommandを参照してる✅
よくある落とし穴 🕳️💦
-
CanExecuteが更新されない🥺
- 状態が変わったのにボタンが有効/無効切り替わらないときは、
CommandManager周り(再評価タイミング)を疑うと早いです。(Microsoft Learn)
- 状態が変わったのにボタンが有効/無効切り替わらないときは、
-
Executedで全部やり始めて太る🐘

-
画面操作・入力検証・注文処理・ログ…を1メソッドに詰めると一気に読めなくなる😵
-
例外やエラーメッセージがUI依存になりすぎる⚠️
- “見せ方”はUIだけど、“判断”は寄せられるなら寄せたい(のちの章で効いてくる✨)
演習 ✍️🎀
次のどれか1つだけでOK(10〜30分)🙂✨
- 入力がマイナスなら押せないにする
amount > 0を使ってるので、すでにできてるはず!✅- じゃあ次は「上限 1,000,000 円まで」みたいなルールも追加してみよ💰
- “注文確定”を2回連打できないにする
- 「実行中フラグ」を作って、実行中は
CanExecute = false - 実行が終わったら
trueに戻す - 最後に再評価を促す(
InvalidateRequerySuggested)✨(Microsoft Learn)
- ショートカットキーを追加する
- Ctrl+Enter だけじゃなくて、F5でも注文確定、とか🎹✨
InputBindingsにKeyBindingをもう1個追加!
チェック ✅✨
-
ICommandが 2メソッド+1イベントでできてるって言える🙂(Microsoft Learn) - ボタン・メニュー・キー入力が 同じCommand にぶら下がってる🎀
-
CanExecuteがfalseのとき、UIが 自然に無効化されるのを確認した😴➡️💪 -
CommandManagerが “再評価のタイミング” に関わることを言葉にできる(超ざっくりでOK)🧩(Microsoft Learn)